|
|
|
 The maille maker's
a.k.a page two!
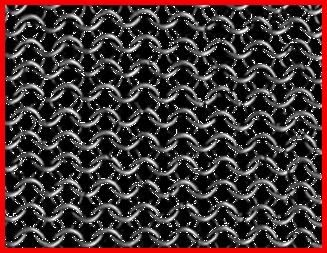
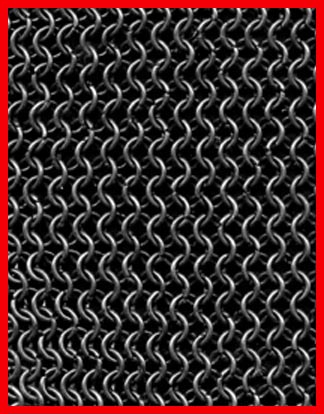 First off, let's have a look at the object
of this page of instructions. This
is a part of one of my first chainmaille projects: a pair of
maille bracers . It does look a little confusing if you look at
it as a whole. To make any sense of what this consists of,one
must take a closer,more confined look.
First off, let's have a look at the object
of this page of instructions. This
is a part of one of my first chainmaille projects: a pair of
maille bracers . It does look a little confusing if you look at
it as a whole. To make any sense of what this consists of,one
must take a closer,more confined look.
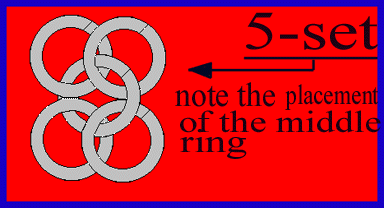
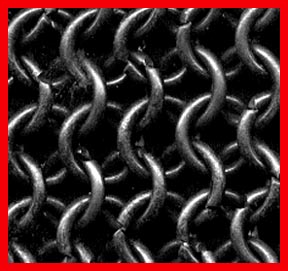 This is a much closer look
at the maille pattern. Still a little confused? Just pick out one
ring ( or link ) and then look at the four rings immediately
surrounding it. This is the basic 5-set. We will get back to this
later on when we start the actual weaving of the maille.
This is a much closer look
at the maille pattern. Still a little confused? Just pick out one
ring ( or link ) and then look at the four rings immediately
surrounding it. This is the basic 5-set. We will get back to this
later on when we start the actual weaving of the maille.
![]() turning the wire
turning the wire
Set your jig in front of you,with the wire and cutters close by. Get the gloves on,and insert the end of the wire into the small hole you have predrilled into the mandrel of the jig. Keeping one hand on the wire as a guide,use the other hand to start the cranking of the handle.
THIS IS IMPORTANT!!!!!!!!!!!! DO NOT LET GO OF THE HANDLE UNTIL YOU HAVE CUT THE COIL FROM THE WIRE! THERE IS ENOUGH STORED ENERGY IN THE COIL TO SPIN THE HANDLE BACKWARDS SEVERAL TIMES,RISKING POSSIBLE INJURIES TO WHATEVER PART OF YOUR BODY THAT IS IN THE WAY! ALWAYS CUT THE WIRE FREE FIRST!!
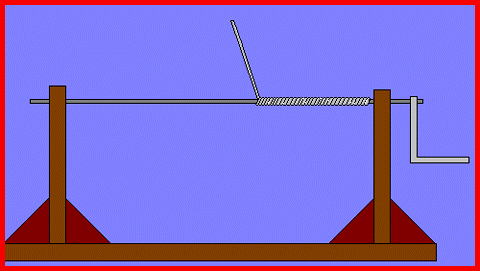 Now
that the warning is out of the way,Proceed to turn the handle
while guiding the wire carefully down the mandrel,until you reach
the end. Now,while holding the handle in place with one
hand,release the wire and take your cutters with the other,and
snip the wire free from the coil. Snip it as close to the mandrel
and coil as possible,to help prevent excessive wastage of the
wire. Next,snip the wire at the point where it enters the
mandrel. Pull the mandrel out of the uprights,and there you are:
a nicely turned coil. Go ahead and make a few more: for
practice,and because you'll usually need more links than one coil
can provide for most maille projects. Later on,I'll post a plan
for a jig to help prevent overcoiling
(turning the wire back over the coil. It wastes wire,and can
cause injury,if you get skin caught between the wire).
Now
that the warning is out of the way,Proceed to turn the handle
while guiding the wire carefully down the mandrel,until you reach
the end. Now,while holding the handle in place with one
hand,release the wire and take your cutters with the other,and
snip the wire free from the coil. Snip it as close to the mandrel
and coil as possible,to help prevent excessive wastage of the
wire. Next,snip the wire at the point where it enters the
mandrel. Pull the mandrel out of the uprights,and there you are:
a nicely turned coil. Go ahead and make a few more: for
practice,and because you'll usually need more links than one coil
can provide for most maille projects. Later on,I'll post a plan
for a jig to help prevent overcoiling
(turning the wire back over the coil. It wastes wire,and can
cause injury,if you get skin caught between the wire).
![]() cutting the links
cutting the links
Now,get yourself a bowl of some sort,grab the coils you have made and the cutters and make yourself comfy! Starting at one end of the coil,take the cutters and place the backside of them flush with the clipped end of the coil. This is so you can get the cut link as close to round as possible. Move the cutters forward and cut the coil,and there you go: a newly cut link! Proceed to cut the rest of the links free from the coil (pretty soon,you'll have no coil left!).
![]() let the weaving commence!
let the weaving commence!
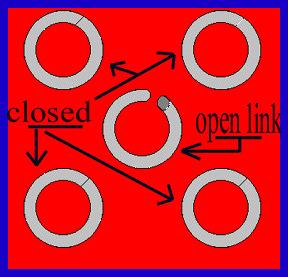 Maille is made in several basic patterns,the most
prevelent being the European 4-1 pattern. Just as the name
implies,it consists of 4 links with a fifth link passing through
the four. First off,you need to close 4 links completely,and keep
a fifth link handy,and opened.
Maille is made in several basic patterns,the most
prevelent being the European 4-1 pattern. Just as the name
implies,it consists of 4 links with a fifth link passing through
the four. First off,you need to close 4 links completely,and keep
a fifth link handy,and opened.
 Now,pass
the opened link through the four closed links, close the open
link with the pliers, then lay them down flat in this pattern.
This is the basic 5-set.
Now,pass
the opened link through the four closed links, close the open
link with the pliers, then lay them down flat in this pattern.
This is the basic 5-set.
Now the fun part,adding the next rings. The easiest way to do this is to use two more closed links,and one more opened. Pass the opened link through the two links at the end of the 5-set, then place the two closed links in the opened link. Close the open link,and lay it down just the 5-set at the beginning. If you get confused,just concentrate on the two closed links you are adding,and getting them to lay correctly. See the photos at the top of the page if you need to see how it should look.
Keep adding links with this proceedure until the chain is the length you need for the project. The next part is easy. Take an open link,and pass it through the first two links on the top row. Take the next open link and pass it through the second and third links,not the third and fourth. This is vital in getting the pattern correct. Next,open link through the third,and fourth,ect., until you reach the end of the row.
Starting the next row,you need to change up one thing for the pattern to remain correct ( elsewise,you will end up with a slowly shrinking project). Pass one ring through the first ring,and close. Pass the next ring through the first two rings,and continue on like you did with the first row. However ,when you reach the end of the row,you will need to add one single ring to the last ring of the bottom row.
Alternate your rows just like this,and you will have a nice sized sheet of actual chaimmaille sitting in your lap,just waiting to be turned into any project you want, be it keychains, coifs,bracers,ect. You can use this basic method in creating just about any maille project you want,small or large.
You need to know this,however, the chain needs to
always run like this :--------->
 NOT like this! You don't get
any lateral expansion of the maille if it is run like this,and
much of the strength of the links appears to be lost in this
manner,they just do not seem to work as team,bearing the loads,in
this manner.
NOT like this! You don't get
any lateral expansion of the maille if it is run like this,and
much of the strength of the links appears to be lost in this
manner,they just do not seem to work as team,bearing the loads,in
this manner.
Well, I do hope I have helped you, in some small way, in achieving your desires and dreams. Maille is easy,probably the easiest form of armour you can make ( without friends or neighbors attempting to terminate you with extreme prejudice),with the least amount of materials,sweat,tears,and blood! It is relaxing,and you can do it in the comfort of your home,watching your Favorite medieval movie ( I prefer 'Braveheart',or '13th Warrior'). It's even fun to work on at work ( during your breal or lunch,of course!),you'll end up geting some funny looks and lots of questions. Just remember, if they want to know what you're doing,why,or how,explain it to them, DON'T blow them off!! They may be interested in the same things as you,and lack the knowledge or resourses to start. Help them out,as a true Knight would!
 I'll
post some plans soon on various maille projects to help you on
your way, such as:
I'll
post some plans soon on various maille projects to help you on
your way, such as:
Please check back soon,and thank you for visiting!