|
|
|
 leatherwing's gallery
or.....
 Lookie at
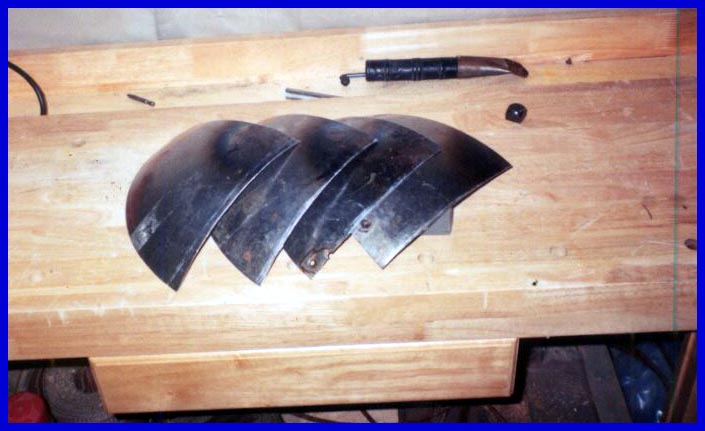
the big,bad warrior! I just love the drapes in the background (yeesh!) This is a picture of the first shield I
ever constructed. It consists of 2 layers of 1/4 inch
plywood glued togather and wrapped around a barrel to dry for a
week. I, then,cut out the heater shape,sprayed on 2 coats of
primer,strapped the shield,and painted on our family coat of
arms. Those are supposed to be: "3 falcons,belled and
jest" and 3 pheons upon the chevron. It looks more like
3 pigeons taking a walk! ( That is the last time I use stencils!) I made it for my father for christmas,I
have never seen the man so bug-eyed before in my life! He is
trying to figure out how to mount it above his bed,without the
thing falling on his noggin!
Lookie at
the big,bad warrior! I just love the drapes in the background (yeesh!) This is a picture of the first shield I
ever constructed. It consists of 2 layers of 1/4 inch
plywood glued togather and wrapped around a barrel to dry for a
week. I, then,cut out the heater shape,sprayed on 2 coats of
primer,strapped the shield,and painted on our family coat of
arms. Those are supposed to be: "3 falcons,belled and
jest" and 3 pheons upon the chevron. It looks more like
3 pigeons taking a walk! ( That is the last time I use stencils!) I made it for my father for christmas,I
have never seen the man so bug-eyed before in my life! He is
trying to figure out how to mount it above his bed,without the
thing falling on his noggin!
 Well,here is the start
of my spangenhelm. The four pieces you see to the right are
actually an old,hand hammered wok I found at a thrift store( we had a lot of fun on
the Armour Archive over that one. Wok and roll!) Once I get these dished out properly,they
will form the panels of the helm. It is truely amazing how well a
jig saw with a metal cutting blade cuts.
Well,here is the start
of my spangenhelm. The four pieces you see to the right are
actually an old,hand hammered wok I found at a thrift store( we had a lot of fun on
the Armour Archive over that one. Wok and roll!) Once I get these dished out properly,they
will form the panels of the helm. It is truely amazing how well a
jig saw with a metal cutting blade cuts.
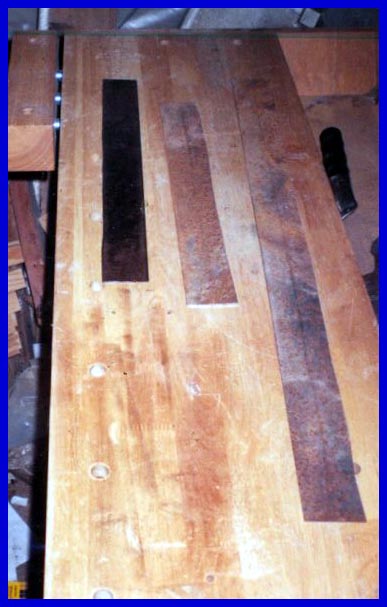 These are the 3 band of
the helm. The
first one has been sanded down to remove the severe surface rust
encrusting it. I found the metal in a scrap yard,rusted badly,but
just the right thickness( 16 gauge).Shoot,beggars can't be choosers! Later,I
soaked all three bands in white vinegar for about eight hours
each,to remove the rust in the pitted areas. There are quite a
few pits in the steel,but I believe it will give the finished
helm an older,authenic look.
These are the 3 band of
the helm. The
first one has been sanded down to remove the severe surface rust
encrusting it. I found the metal in a scrap yard,rusted badly,but
just the right thickness( 16 gauge).Shoot,beggars can't be choosers! Later,I
soaked all three bands in white vinegar for about eight hours
each,to remove the rust in the pitted areas. There are quite a
few pits in the steel,but I believe it will give the finished
helm an older,authenic look.
 here are two of the bands
clamped togather. I dished the top band between two wooden
yard stakes nailed to my anvil stand. I still need a ball stake ( still searching.....) to planish the bands upon. Believe
me,hammer marks do not a pretty helm make!
here are two of the bands
clamped togather. I dished the top band between two wooden
yard stakes nailed to my anvil stand. I still need a ball stake ( still searching.....) to planish the bands upon. Believe
me,hammer marks do not a pretty helm make!
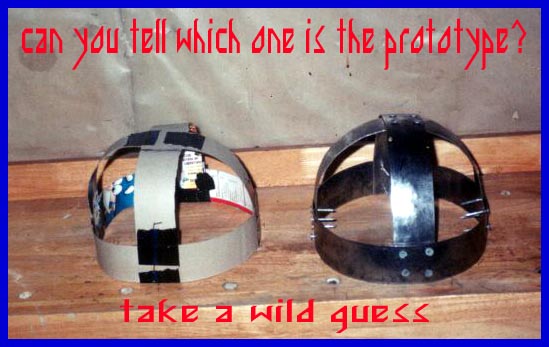 Well,can ya tell,can ya
tell? (Here's
a hint: look for cardboard and duct tape!) Well,it's always a good idea to make a
paper prototype before cutting and pounding steel. By the way,if
you looked real close at the helm skeleton and saw something
strange,trust me,your eyes are not deceiving you. it is being
held togather with nails! Well,I had to hold it togather with
something for the pics,and I had run out of screws. I plan on
using the screws to assist in the final shaping and fitting of
the helm before final rivitting.
Well,can ya tell,can ya
tell? (Here's
a hint: look for cardboard and duct tape!) Well,it's always a good idea to make a
paper prototype before cutting and pounding steel. By the way,if
you looked real close at the helm skeleton and saw something
strange,trust me,your eyes are not deceiving you. it is being
held togather with nails! Well,I had to hold it togather with
something for the pics,and I had run out of screws. I plan on
using the screws to assist in the final shaping and fitting of
the helm before final rivitting.
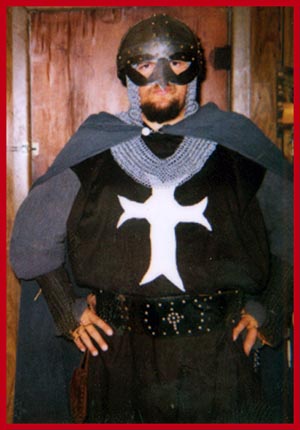 Well,here
is a picture of my complete kit (so far). I wanted to
get a few more pics of the helm during construction,but my poor ( read:CHEAP)
camera finally gave up the ghost during the summer,and I haven't
been able to pick up a decent one ,yet. I finished the helm (for the most part)
and surcoat just before Halloween. The complete kit consists of:
Well,here
is a picture of my complete kit (so far). I wanted to
get a few more pics of the helm during construction,but my poor ( read:CHEAP)
camera finally gave up the ghost during the summer,and I haven't
been able to pick up a decent one ,yet. I finished the helm (for the most part)
and surcoat just before Halloween. The complete kit consists of:
Yeah,I know it's a lot of Black,but they don't call me the Dark Knight for nothing!! I would have worn my sword and carried my shield that night,but I got more than enough strange stares that day ,without giving them something to call the cops on.
It was real fun picking my oldest son up at school all armoured up like this! I had lots of parents and kids asking how I made the stuff,or where did I buy them from. Sorry,everything except the boots were made by me!
new!! Gallery page 2- Pics from scarborough faire 2002!
This page designed by Leatherwing Sevices,May 2001